

Key Takeaways
- A running toilet is almost always caused by a faulty flapper, a misadjusted float, or a worn fill valve.
- Replacement parts for all three components typically cost under $20 at most hardware stores.
- You can diagnose the exact problem in under five minutes without any special tools.
- Most repairs require only a towel, adjustable pliers, and the replacement part.
- Fixing a running toilet can prevent thousands of gallons of wasted water per month.
What you will need
Why a Running Toilet Is Worth Fixing Now
A toilet that won't stop running can waste an estimated 200 gallons of water per day, according to the U.S. Environmental Protection Agency - the equivalent of flushing dozens of times an hour with nothing to show for it. Beyond the water bill, constant water movement accelerates wear on tank components, meaning a minor problem can quietly become a bigger one. The good news: the cause is almost always mechanical, the parts are inexpensive, and the repair is well within reach for most homeowners. Before you call a plumber, it's worth spending a few minutes understanding what's actually happening inside the tank. And if you want to avoid common mistakes along the way, our guide to DIY plumbing myths covers the missteps that can turn a simple fix into a bigger problem.
Use Food Coloring to Catch a Slow Leak
Add a few drops of food coloring to the tank and wait 10-15 minutes without flushing. If color appears in the bowl, your flapper is leaking even when it looks fine from above. This simple test saves you from replacing parts that don't need it.
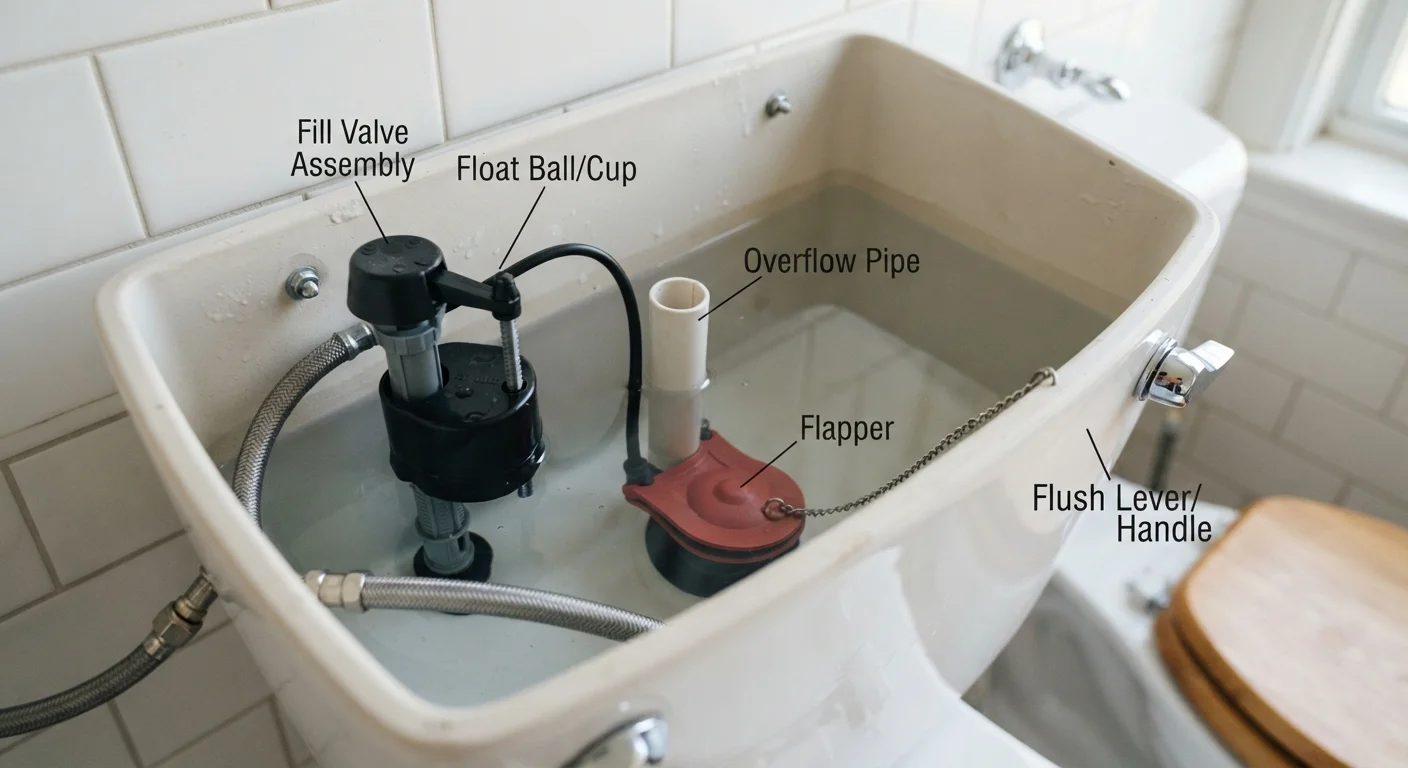
Here's what each component does:
- Flapper: A rubber seal that covers the hole at the tank bottom. It lifts during a flush and drops back to hold water in the tank between flushes. When it warps or hardens, water seeps continuously into the bowl.
- Float: A buoyant device that rises with the water level and signals the fill valve to shut off when the tank is full. If it's set too high, water overflows into the overflow tube and the fill valve never stops running.
- Fill valve: Refills the tank with fresh water after each flush. Its internal seal wears over time, causing a persistent hiss even when the tank is full and the float is correctly set.
When to Call a Licensed Plumber
If you notice water on the floor around the toilet base, cracks in the tank or bowl, or significant corrosion on supply lines and shut-off valves, stop and call a licensed plumber. These issues go beyond the scope of basic tank repairs and can involve water damage or structural risk if handled incorrectly. Permitted or structural plumbing work in your area may also require a professional.
Tools and Parts You'll Need
You don't need a plumber's toolkit to fix a running toilet. Most repairs call for nothing more than a dry towel and a replacement part. Gather what you think you'll need based on your diagnosis before shutting off the water - it saves time and extra trips.
Adjustable pliers
Used to loosen and tighten the fill valve lock nut and supply line connections.
Replacement flapper
Seals the flush valve opening at the bottom of the tank to stop water from continuously draining into the bowl.
Replacement fill valve
Refills the tank after each flush; replaced when the internal seal wears out and water runs constantly.
Old towel or sponge
Absorbs residual water from the tank bottom after flushing, keeping your workspace dry.
Food coloring or dye tablet
Used to test whether the flapper is leaking without disassembling the tank.
What you will need
Step-by-Step: Diagnosing and Fixing the Problem
Work through these steps in order. In most cases, you'll identify and resolve the issue before reaching the final step.
Identify the symptom
Listen to how the toilet runs. A hissing sound that continues long after a flush usually points to the fill valve. Water trickling into the bowl silently - detectable with the food coloring test - typically means the flapper is leaking. A toilet that runs in short, random bursts (called "phantom flushing") is almost always a flapper issue. Identifying the pattern before opening the tank points you straight to the right fix.
Shut off water and empty the tank
Turn the shut-off valve clockwise until it stops. Flush the toilet to drain the tank, then use a towel or sponge to soak up any remaining water at the bottom. This gives you a dry, safe workspace and prevents spills when you disconnect or swap parts.
Check and replace the flapper
The flapper is the rubber seal at the very bottom of the tank that lifts when you flush and drops back down to seal the flush valve. Over time, it warps, hardens, or builds up mineral deposits. Unhook the flapper's ears from the pegs on either side of the flush valve and slide the chain off the flush handle arm. Take the old flapper to the hardware store to match the size, or look up your toilet model number (usually stamped inside the tank lid) to find a compatible part. Hook the new flapper onto the pegs and clip the chain, leaving about half an inch of slack.
Adjust or replace the float
The float controls when the fill valve stops adding water. On older toilets, this is a ball float - a hollow ball on the end of a metal or plastic arm. Bend or adjust the arm downward so the ball sits lower, stopping water flow about one inch below the top of the overflow tube. On newer toilets, a cup float slides up and down the fill valve shaft; pinch the clip or turn the adjustment screw counterclockwise to lower the water level. Re-open the water supply briefly to confirm the tank fills to the correct level and shuts off cleanly.
Replace the fill valve if needed
If the fill valve hisses continuously even after the tank reaches the correct water level, the valve's internal seal has worn out. Turn off the water, empty the tank, then use adjustable pliers to unscrew the lock nut on the underside of the tank where the supply line connects. Lift the old fill valve out. Insert the new valve, set the height according to the instructions included with the part (typically so the critical level mark sits about one inch above the overflow tube), hand-tighten the lock nut, reconnect the supply line, and restore the water supply. The tank should fill quietly and shut off completely.
Test and confirm the repair
Restore the water supply fully and allow the tank to fill. Flush once and watch: the tank should refill and go completely silent within 60-90 seconds. Perform the food coloring test again to confirm no water is leaking into the bowl. Replace the tank lid. If the toilet still runs, revisit each component - occasionally two parts fail at the same time, especially in older toilets.
Turn Off the Water Before You Start
Always close the shut-off valve on the supply line behind or beneath the toilet before opening the tank. Skipping this step can result in an uncontrolled water flow if a part slips or breaks during the repair. Flush once after closing the valve to empty the tank before working.